Dead Synchronicity: Tomorrow Comes Today walkthrough
About this walkthrough
This is a complete walkthrough for Dead Synchronicity: Tomorrow Comes Today.
Using this walkthrough will get you through the game with the least amount of time and wandering around, but may spoil the game and fun of exploring.
Items which can be picked up as inventory items and items which can be constructed by combining or using other items are written with bold text for emphasis.
Act I - A Camp Full of Rats
 Act I - A Camp Full of Rats
- You wake up in the dark. You can access the inventory, but it's empty for now. There is an oil lamp in the middle of the screen. Light the lamp and you will automatically enter a discussion with Mr Atkinson. Go through the conversation to find out more about your situation.
- You can try to interact with objects in the room, but right now the only useful thing you can do is open the oven. Pick up a pot lid and an old notebook. You can read the notebook, if you like, but it won't help much for now.
- Leave the trailer and go outside.
- You will see a disturbing cutscene which also introduces you to Hank, the Hunter.
- After the cutscene start exploring the area. You will get a cut on your foot though, as you are not wearing any shoes. You will automatically start a conversation with the homeless man. Go through the conversation to find out more about your situation.
- The homeless man keeps telling you to stay away from his shopping cart, which of course means that you should get stuff from his shopping cart. Use the pot lid on burning drum to distract the man. Then pick up a credit card from his shopping cart.
- You need to treat your injuries before you can go further. Go back inside the trailer.
- Open the locked wardrobe with the credit card.
- Take the bottle of whiskey and pillowcase.
- Pull the sheet on the bed to reveal a protruding bedspring.
- Use pillowcase with the protruding bedspring to tear it and get some bandages.
- In the inventory, pour whiskey on bandages. You now have soaked bandages.
- Interact with old shoes in the wardrobe and you automatically put bandages in them to treat your injuries.
- The homeless man outside finds the pot lid and is raging so loudly that Mr Atkinson opens the locked room in the trailer. Go inside to see his son. You will automatically end up in a conversation. Go through the conversation to find out more about everything.
- Now you have a fetch quest to accomplish. Exit the trailer to begin it.
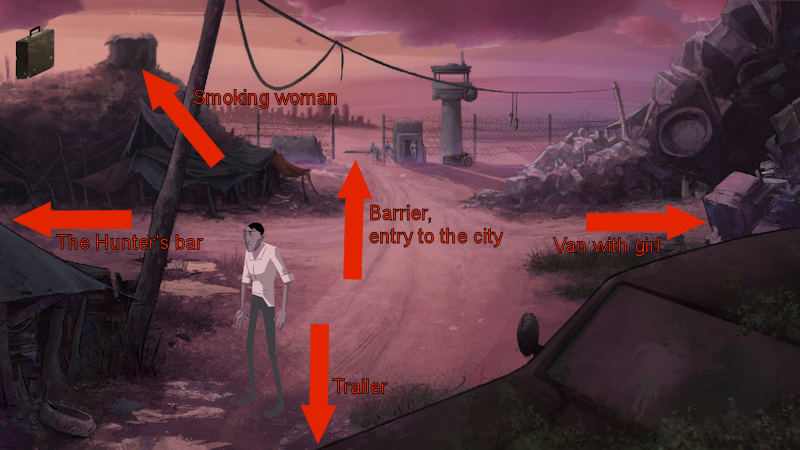 Crossroads directions.
- Walk away from the trailer and exit towards the bottom of the screen. In the crossroads walk on and go to the barrier that is separating the refugee camp from the city. Talk to the gate sentries to find out how one can exit the refugee camp with a gate pass.
- Go to a house on a small hill right next to the gate. Inside the house is a smoking woman, talk to the woman to find out that she possesses a pass that can get you through the gate to the city. She wants to get some morphine for her husband and some food for her kids.
- There is an overturned drawer on the floor with a pack of cigarettes under it. You can try to take them but you can't for now.
- Exit the room using the door on the left side. There are kids playing with rocks. Talk with the kids to find out what they would like to have for their target practice.
- Go through the house to return to the crossroads.
- Go left to find a brick building in the middle of oil drums.
- Enter the brick building to find a bar that is owned by the Hunter. Talk to him to find out that he can get you anything for a proper price. Talk to the bartender too to find out how the trading works.
- There are some empty beer cans on the bar table next to the bartender, take them and leave the room.
- Go back to the house where the smoking woman was. Go through the left door to see her kids outside. Give the empty beer cans to them. You will automatically enter a discussion with the kids. Ask for their help.
- Go back into the house. The woman is gone now, so pick the pack of cigarettes from the floor.
- Leave the house and go back to the bar.
- Talk to the bartender and exchange the pack of cigarettes and the bottle of whiskey for a food package.
- Go back to the house with the woman and kids and give the food package to the woman. You will get mole's bracelet in return.
- Go to the barrier and show the bracelet to the sentries. Now you are able to exit and enter the refugee camp.
Act II - Doomsday City
 Act II - Doomsday City- You enter the city. There are some city dwellers on the right who you can talk to if you like. There is also an old man trying to enter a building on the left, you can try to help him but can't do much for now. Look at the wall with posters on the left. There is one particular poster that catches your eye at the bottom, the one which has the slogan "Tomorrow Comes Today".
- Walk to the right. This may be a bit tricky to spot for the first time, but you can actually keep walking quite far to right even though it may first appear that your only choice is to enter the church. Don't click on the door icon of the church, but somewhere on the right side you should be able to see a closed subway entrance. Clicking the door icon on the far right will lead to a new area with entrances to the medical center and the park.
- Find and pick up a plank with message that is attached to the tree stump. You will get some rusty nails too.
- Go back and enter the ruins of a church.
- You want to talk to the Reverend, but he is busy with his sermon. There is a damaged sculpture at the right in the back. Use the plank with the statue to create a lever and then use it to give the Reverend a "sign".
- Watch the cutscene and after it pick up the thick jagged piece of glass from the ground.
- Talk to the Reverend to learn about the signs. Exit the church and go back to the park entrance.
- Use the thick jagged piece of glass to dig the damp soil under the park gate. Now you have a hole which you can use to enter the park.
- A hanged man is hanging from a rope that is tied to the ground with a crowbar. Take the crowbar and rope.
- Nothing more can be done here for now so make your way back to the refugee camp barrier but don't go back to the camp. There is an old tree on the left, so go to it.
- Use the rope on the tree to gain access down. Go down and search the hewn stones to find a carved stone.
- Climb back up, return to the city and go back to the ruins of a church.
- In the church, give the carved stone to the Reverend. The Reverend runs back to the temple, but drops his stick on the way out. Pick up the cross-shaped stick from the ground.
- Return to the refugee camp and the old car that is park in front of the trailer where you first woke up.
- Use crowbar to open the car door. Search the car to find a seat cover and an elastic band.
- Combine the elastic band with the cross-shaped stick to create a slingshot.
- Go back to the kids you met earlier and give them the slingshot you just made. Watch the short cutscene to see what consequences that action had.
- Now return to the barrier where there are no gate sentries at the moment.
- Search the motorcycle saddlebag to get rubber gloves.
- Return to the city and go to the old man who is trying to enter a building. You can't open the door even if you would try to use the crowbar on it, but there is a basement window just under the posters. First use the seat cover on the window to silence much of the noise and then use crowbar to break the window.
- The old man goes inside but leaves bolt cutters on the ground. Pick them up and go back to the park.
- Use the bolt cutters to clear a pathway in the wall of trees and bushes. Now you can use this route to enter the hospital compound.
- There is an electrified wire blocking the way. Use the rubber gloves on the electrified wire and you will cut an opening in the fence.
- Open the half-buried plate on the ground to find a trapdoor that leads into the facility. Enter the trapdoor.
- Inside is a dark room which you can't enter without more light, so go through the door in the back to enter a disturbing room. Use the bridge to walk over to the other side to the ventilation grate. You will automatically pick up a container that is acid jug and remove the crate.
- Crawl through the hole to enter the corridor on the other side.
- Take black bag from janitor's cart and then enter through the door on the right.
- There is a locked glass case to the right of the lockers, use the crowbar to break it open. The noise will alert a nurse (very) nearby and you will automatically enter a discussion with the nurse. Go through the conversation to find out more about everything. After the conversation, take morphine from glass case.
- Before leaving the locker room search nurse's dilapidated desk to find a small key.
- Go back to the corridor and use the small key to open the metal closet. (EASTER EGG: There are some forms on the metal closet door. Reading them through will reveal few Kickstarter backers' names and faces.)
- Take a wooden crate from the closet. You will automatically also pick up a GPS, an ID, and a report on the cure.
- Go all the way back to the barrier between the city and the refugee camp.
- Try to enter the camp, but it is closed. The soldiers are trying to find out who killed the guard in the tower before. You need to find someone they can hold responsible for it.
- Go back to the tree with the rope. Climb down and examine a dark bundle.
- You found actually Reverend's corpse. Search his pocket to find a damp, moldy business card. Reading it will give you an address to visit later.
- As the soldiers are looking for a guilty person, you need to make it look like it was the Reverend who killed that soldier. First put the slingshot in the pocket where you took the business card from.
- The problem now is that no one is going to believe that the Reverend killed the sentry. So you need to mutilate the body so that it's unrecognizable. Take the acid jug and pour acid on the face of Reverend Blake. It's halfway done. Now to finish it off brutally, use the thick jagged piece of glass on the partially disfigured face of Reverend Blake.
- Go talk with the gate sentries and tell them that you found the guilty person.
- You can now enter the camp again. Go to the house with the smoking woman and give her the morphine. She will give you a wad of cash in return.
- Next, go back to the trailer and talk with Mr Atkinson. Show him the report on the cure.
- After the heated conversation and cutscene, go back to crossroads. This time walk right to find two men who are keeping a mentally ill girl as a prostitute. You need to talk with the girl, but the men will allow inside the van only if you pay. Give the wad of cash to the men and you gain an access to the van.
- Go inside the van and talk with the girl to find out what she wants. After the conversation check out the toolbox that is lying on the floor. Take hand drill and wire with burnt out lights. Look at the dirty wringled page that is attached to the wall.
- Leave the van and go back to the Hunter's bar.
- There are people in the bar but the door is not opening. You need to create some kind of disturbance to get them out.
- Use the hand drill on the line of drums to get the liquid inside to spill out.
- Next you need to cut the power from the house. You can try to use bolt cutters on the electrical wire, but it's too high and out of reach. What you need to do is pick up an empty drum and place it on top of the other ones. Confusingly, there is no separate hot spot for doing this, simply try to pick up the line of drums, and this should happen automatically.
- When the drums are on top of each other, cut the electrical wire using the bolt cutters. A cutscene will follow and you end up inside having a conversation with the Hunter.
- After the conversation, if you haven't already done so, look at the GPS in your inventory. Talk about the GPS with the Hunter. He will give you some batteries in exchange for an ID card.
- Put the batteries in the GPS. You need to go outdoors to use it properly. When you try to leave, the Hunter wants to talk to you. He wants you to take a photograph that he needs, and in exchange can arrange for you an opportunity to talk with Colin, Mt Atkinson's son.
- After the conversation, first pick up the electrical tape from the bar table and then go outside and use the business card with GPS to have an address to locate in the city.
Act III - Oracles and Ashes
 Act III - Oracles and Ashes- You will automatically end up in a new place with two soldiers on the street and a building you want to enter. You can talk with the soldiers and enter the bookstore if you want to, but for now it is only necessary to pick up an empty tin can from the trash can.
- Go back to the park entrance you have visited before, and use the empty tin can with the rotten fish that are in the stone fountain. You now have a can with rotten fish.
- Return to the street where you were a moment ago, but on your way there, stop in front of the church to have a look at the closed subway station. There is a subway sign on the wall, use the crowbar to tear it off the wall. It will end up as a broken metal sign in the inventory.
- Now return to the street with the two soldiers and pull the canvas tarp near the trash cans. Put the can with rotten fish in the trash can.
- The soldiers have moved and their attention is elsewhere, so you can tinker with the electrical panel that is located in the wooden post. The goal here is to have the lights go out so you can be in the dark. The way to achieve this, is to have the lights burn out the circuits. There are three buttons, one for each light. The settings can make the lights brighter or dimmer. You need to make all three lights to shine as bright as possible, in other words, to have as much electrical current to flow through the wires as possible. You will also hear an audio hint, whenever you change a setting the noise becomes louder or higher-pitched if the electrical current gets stronger. The settings for this puzzle are random, so if all else fails, resort to trial and error (there are only a limited number of combinations here). When you find the right settings, push the red button to fry out the circuits.
- Now enter the bookstore on the left. If you want to find out more about where you are and why, take a look at the charred posters on the wall.
- There are wooden boards on one of the shelves, take them.
- Use the crowbar to open a blocked door on the right, and then go through the door.
- You are now on the fire escape of the building, use it to go to the rooftop of the building. (A door symbol appears when you move the mouse near the rooftop, you don't actually need to interact with the fire escape otherwise.)
- Take a bucket from the rooftop and then go inside.
- Take the handwritten note from the door to the apartment, which will end up as Sarah's note in the inventory.
- It is not necessary to do so, but you may want to take a look at the metal plaque next to the door to find out something.
- Exit the building. (The exit may be a bit tricky to spot first. It is the door symbol at the bottom of the screen, where the arrow points a bit differently than the door symbol that leads back to the rooftop.) Try to leave the area, but a violent cutscence will follow instead.
- After the cutscene, pick up the flashlight from the street. There are also some blood stains on the street, examine that and you will find a tooth fragment of your own tooth. Then and go back to the refugee camp barrier.
- Go to the tree with the rope. Use the bucket with water to fill it with water, and now you have a bucket of water.
- Go inside the refugee camp and return to the trailer. Use bucket of water to extinguish the bonfire.
- Pick up a burnt doll from the extinguished bonfire.
- Go to the van where to girl is. Give the burnt doll to her. You also need to creat a makeshift crib for the "baby".
- Use wooden boards with the wooden crate to have a wooden crate with legs. The use the broken metal sign with the wooden crate with legs to get a cradle.
- Give the cradle to the girl, and she will give you a key in return.
- Go back to the door of the apartment and use the key to open the door and go inside.
- Open the work closet and pick up an instant camera.
- It is not necessary to do so, but you may want to take a look out of the window to find out something.
- Next, study Sarah's note and then examine the file cabinet. The goal here is to find something that would match the logo (T.n.T.) on the paper.
- When you find the newspaper "The New Truth", compare it with Sarah's note in the inventory by using the objects together.
- Now you need to use the newspaper "The New Truth" with the GPS to get the location of the newspaper office, but must go outside to do that.
- If you haven't already examined things on the table, you will automatically see a photograph from your former life and a cutscene when trying to leave the room. After the cutscene, you can leave the room and operate the GPS on the street.
Act IV - Old and New Truths
 Act IV - Old and New Truths- You will automatically go to the newspaper office and after a cutscene start a conversation with the man who runs the newspaper. Go through the conversation and when you finish it you will have a sewer system map in the inventory.
- Exit the office and go back to the area where the entrance to the park is located. In front of the park gate is a closed manhole. Open it using the crowbar and then go into the sewers, in order to enter the manhole you need to use flashlight on the manhole, if you try to climb down otherwise, you will climb back up immediately, because it's too dark.
- Walk to the right and search the waste heap that you will come to. Use the crowbar when you can't move it with your hands.
- You will find a corpse, Sarah's corpse, search it to find a flash drive. Pick up the flash drive.
- Return to the newspaper office.
- Talk to the newspaper boss. You can choose to tell the truth or lie about his wife, it doesn't change the outcome.
- As a result of the conversation, you need to go find an electric generator. Before you leave the newspaper office, search the open trunk with jumbled objects inside. You will find some instant camera film.
- Use the instant camera film with the instant camera. The camera is still broken, so you need to fix it with a tooth fragment(!?!?). Now you have a loaded instant camera that you should use to get the picture that the Hunter wanted.
- Go back to the park. The right place to take the photograph is as far right as you can go, where you can see the description "view of the hospital compound". If you try to take the photo now though, you will find that there isn't enough light. You need to go inside the hospital compound to make it better lit somehow.
- Go through the fence and hole to enter the compound just like before. This time once inside, go to the dark room. Use the flashlight at the door to see what's inside. There is a control panel, operate it to make the outside lights to switch on.
- Now return to the park and you should see "lighted fuel depot" below. Use the loaded instant camera to have a picture of it.
- After you have done that and have photo of fuel depot in the inventory, return to the refugee camp.
- Go to the Hunter's bar and give him the photo of fuel depot. An automatic conversation will follow.
- Leave the bar and go back to the trailer and more specifically, the window of the trailer. Use the crowbar to break the window and go inside. Take a revolver from the cookie box and then talk with the boy.
- Watch the cutscene and then go to the van where the girl is.
- Enter the van and give the revolver to the girl. Watch another cutscene.
- Try to take the generator that is outside next to the van. It is damaged and useless. Soon there will be time distortions and you will see the generator in working condition again. You need to use these distortions to protect the generator from becoming damaged. You can try to use the black bag to cover it, but it only works halfway.
- There are some coins on the table, take them.
- Leave the area for now and go back to the apartment.
- Use coins to loosen the screws on the photography backdrop and when you have it in the inventory, return to the van.
- Wait for another time distortion, and when it happens, use both the black bag and photography backdrop on the generator. After the distortion is over, take the generator.
- Go back to the newspaper office and give the generator to the newspaper boss. There will be conversations and cutscenes, and shocking revelations, but no more playable parts, so sit back and watch what happens.
THE GAME IS FINISHED. CONGRATULATIONS!!!